How to Change Guitar Strings & Tune Up with an Online Guitar Tuner
Changing your guitar strings for the first time can feel like a daunting task. The fear of a string snapping, damaging your instrument, or just getting it all wrong is something every new player experiences. Have you ever worried about snapping a string or messing up your guitar? I’ve been there, and I’m here to tell you it’s much easier than you think. This guide will walk you through how to change guitar strings with simple, step-by-step instructions. Soon, you'll be rewarded with a guitar that not only sounds brighter and more vibrant but is also much easier to keep in tune with a good online guitar tuner.
Why (and When) You Need a Guitar String Replacement
Before we dive into the "how," let's talk about the "why." Fresh strings are one of the most affordable and impactful upgrades you can make to your instrument. They transform a dull, lifeless sound into one that is crisp, clear, and full of resonance. A new set of strings can make your guitar feel brand new again.
Signs Your Strings Are Old (Dull Sound, Rust, Tuning Issues)
Your guitar will give you clear signals when it's time for a string change. The most obvious sign is a dull sound. Your chords won't ring out as long, and individual notes will lack their usual sparkle. You might also see physical signs of wear, like discoloration, grime buildup where you strum, or even small spots of rust. Another major red flag is having tuning issues. If you find yourself constantly having to re-tune, or if your instrument just won't stay in pitch, old strings are often the culprit.

How Often Should You Change Guitar Strings?
This is a common question with no single right answer, as it depends on how often you play. As a general rule of thumb, if you play your guitar for about an hour every day, you should consider a change every 1-2 months. If you play less frequently, you might stretch that to 3-6 months. However, always trust your ears and eyes—if the strings look grimy or sound dead, it’s time for a change, regardless of how long they've been on.
Choosing the Right Strings for Your Guitar (Gauge, Material)
Walking into a music store or browsing online reveals a dizzying array of string options. For a beginner, it's best to stick with "light" or "custom light" gauge strings (e.g., .011-.052 or .012-.053 for acoustic). They are easier on the fingers and are a great starting point. As for string material, the most common for acoustic guitars are 80/20 Bronze (bright and crisp) and Phosphor Bronze (warmer and longer-lasting). For electric guitars, Nickel-Plated Steel is the industry standard.
Beginner Guitar Maintenance: Tools You'll Need
Gathering your tools beforehand makes the process smooth and stress-free. You don't need a professional workshop, just a few key items. Think of this as essential beginner guitar maintenance.
Essential Tools: New Strings, Wire Cutters, String Winder
These three items are non-negotiable. First, you need a new set of guitar strings suited for your instrument. Second, you need a pair of wire cutters to trim the excess string length after installation; regular pliers with a cutting edge work perfectly. Finally, a string winder is a massive time-saver. This simple, inexpensive plastic tool fits over the tuning pegs and allows you to loosen and tighten strings in seconds instead of minutes.
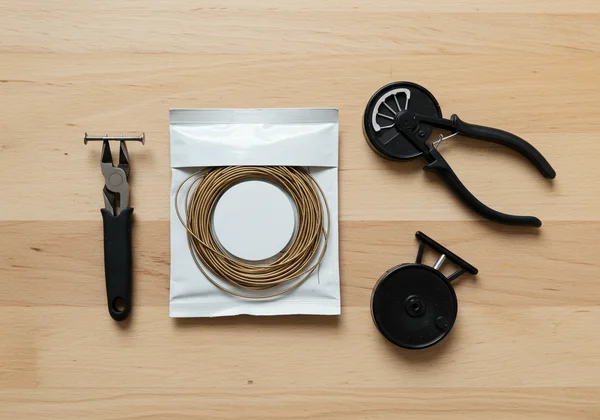
Optional but Helpful: Fretboard Cleaner & Polish
While not essential for the string-changing process itself, having the strings off is the perfect opportunity to give your guitar some love. A dedicated fretboard cleaner or conditioning oil can remove grime and moisturize the wood, preventing it from drying out. A soft cloth and some guitar polish will get the body looking shiny and new.
How to Restring a Guitar: The 5-Step Method
Alright, you've got your new strings and your tools. It's time to restring a guitar. We'll go one string at a time to maintain tension on the guitar's neck, which is a good habit for beginners. Find a clean, flat surface like a table or a bed and lay a towel down to protect your guitar's finish.
Step 1: Loosen and Remove the Old Strings Safely
Pick a string to start with—let's say the thickest one (low E). Use your string winder to loosen the string until it's completely slack. You can then easily uncoil the end from the tuning peg. For an acoustic guitar, you'll need to remove the corresponding bridge pin to free the other end of the string. A string winder often has a small notch designed for this, but you can also gently pry it up with a spoon or a coin. For an electric, the string will typically just pull through the back of the bridge or body.
Step 2: Clean Your Fretboard (A Quick How-To)
With the old string gone, you have clear access to a section of your fretboard. This is the perfect time for that optional cleaning step. Apply a small amount of fretboard cleaner or lemon oil to a clean cloth and wipe down the exposed wood and frets. This quick bit of instrument care will make your guitar look and feel fantastic.
Step 3: Secure the New String at the Bridge (Acoustic vs. Electric)
Take the new string (make sure it's the correct one for the position!). For an acoustic guitar, insert the ball-end of the string into the hole at the bridge and re-insert the bridge pin firmly. Give the string a gentle tug to ensure the ball-end is seated snugly against the inside of the guitar. For an electric guitar, thread the string through the bridge or body, pulling it all the way through until the ball-end is secure.
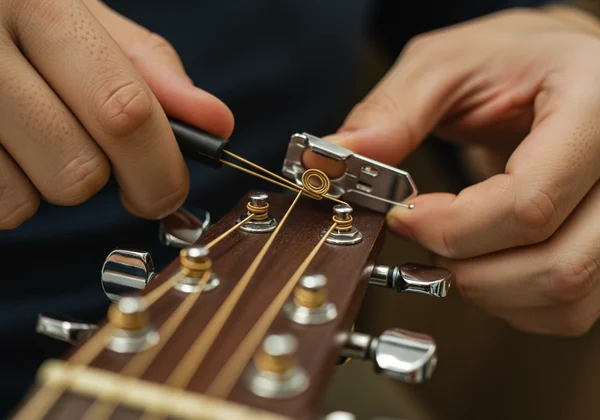
Step 4: Thread and Wind the String onto the Tuning Peg
Pull the string taut up to its tuning peg. A good rule of thumb is to allow for some slack. For the low E, A, and D strings, pull the string past the tuning peg by about two frets' distance before winding. For the higher G, B, and E strings, allow about three frets' distance. Thread the end of the string through the hole in the peg, bend it, and start winding with your string winder. Ensure the string winds neatly downwards on the peg, without overlapping.
Step 5: Tune, Stretch, and Retune with an Online Tuner
Once the string is wound, bring it up to pitch. Don't worry about perfection yet. This is where an easy-to-use chromatic tuner is your best friend. Pluck the string and tighten it until the tuner shows you're close to the correct note (E, A, D, G, B, or E). Repeat steps 1-5 for the remaining five strings.
Final Touches: Tuning and Stretching Your New Strings
You did it! The hard part is over. Now for the most crucial step: getting your guitar to sound amazing and stay that way. This involves a cycle of tuning, stretching, and retuning.
Why Stretching New Strings is Crucial for Tuning Stability
New strings need time to settle. They have a bit of slack and will stretch naturally as you play, causing your guitar to go out of tune quickly. You can speed this process up. Gently tug each new string up and away from the fretboard a few times. You'll notice its pitch drops. This is a good thing! You are simply pre-stretching it to improve tuning stability.
Using an Online Tuner to Get Your Guitar in Perfect Pitch
After stretching, your guitar will be out of tune. Now it's time for the final, precise tuning. This is where a great tool makes all the difference. Using a reliable free online tuner makes all the difference. You don't need to download anything. Just allow microphone access, and the highly accurate display will guide you. Pluck a string, and the visual feedback will tell you if you're flat (too low) or sharp (too high). Adjust the tuning peg until the needle is perfectly centered. For standard tuning, tune your strings to E-A-D-G-B-E, from thickest to thinnest. Using a great microphone tuner ensures you get it just right.

Common Mistakes to Avoid When Changing Strings
As you get the hang of it, keep these common beginner pitfalls in mind. Avoid cutting the string to length before winding it onto the peg—you might cut it too short. Also, make sure you're turning the tuning peg in the right direction (tightening raises the pitch, loosening lowers it). Finally, don't over-tighten a string far past its intended pitch, as this is the most common cause of a string snapping.
Now, It's Time to Play
You've just tackled one of the most essential skills for any guitarist. Giving your instrument a fresh voice with new strings isn't just maintenance—it's part of the journey. The only thing left is the most rewarding part: making music.
Grab your guitar, head over to our free online tuner for that final, perfect tune-up, and enjoy the crisp, vibrant sound you've just unlocked. Play with confidence.
Frequently Asked Questions About Changing Strings
Can I change just one broken string?
Yes, you absolutely can. If you break a single string, there's no need to replace the entire set, especially if the others are relatively new. However, if the set is old and dull-sounding, breaking one string is often a good sign that it's time to replace them all for a balanced tone.
Is it hard to restring an acoustic guitar compared to an electric?
The difficulty is about the same, but the process is slightly different. The main difference is at the bridge. Acoustic guitars use bridge pins that need to be removed, while most electric guitars have a "string-through" body or bridge system that is a bit more direct. Once you've done it once on either type, you'll find it's a straightforward process.
Why won't my guitar stay in tune after changing strings?
This is almost always because the new strings haven't been stretched properly. Follow the "tune, stretch, retune" cycle mentioned in this guide a few times. After playing for a day or two, the tuning will become much more stable. Also, ensure you have enough winds (2-3) around the tuning posts to prevent slippage.
How do I use an online tuner to tune new strings?
It's incredibly simple. Visit an online chromatic tuner on your computer or phone. The browser will ask for permission to use your microphone; click "Allow." Select the "Guitar Tuner" preset for standard EADGBE tuning. Pluck the string you want to tune, and the on-screen display will show you the note you're playing and whether it's sharp or flat. Adjust your tuning peg until the indicator is perfectly centered on the correct note.